添加和管理记忆
AI 应用需要 记忆 来在多次交互中共享上下文。在 LangGraph 中,你可以添加两种类型的记忆:
添加短期记忆
短期 记忆(线程级 持久化)使智能代理能够跟踪多轮对话。要添加短期记忆:
# highlight-next-line
from langgraph.checkpoint.memory import InMemorySaver
from langgraph.graph import StateGraph

# highlight-next-line
checkpointer = InMemorySaver()

builder = StateGraph(...)
# highlight-next-line
graph = builder.compile(checkpointer=checkpointer)

graph.invoke(
    {"messages": [{"role": "user", "content": "hi! i am Bob"}]},
    # highlight-next-line
    {"configurable": {"thread_id": "1"}},
)
import { MemorySaver, StateGraph } from "@langchain/langgraph";

const checkpointer = new MemorySaver();

const builder = new StateGraph(...);
const graph = builder.compile({ checkpointer });

await graph.invoke(
  { messages: [{ role: "user", content: "hi! i am Bob" }] },
  { configurable: { thread_id: "1" } }
);
在生产环境中使用
在生产环境中,使用数据库支持的检查点器:
from langgraph.checkpoint.postgres import PostgresSaver

DB_URI = "postgresql://postgres:postgres@localhost:5442/postgres?sslmode=disable"
# highlight-next-line
with PostgresSaver.from_conn_string(DB_URI) as checkpointer:
    builder = StateGraph(...)
    # highlight-next-line
    graph = builder.compile(checkpointer=checkpointer)
import { PostgresSaver } from "@langchain/langgraph-checkpoint-postgres";

const DB_URI = "postgresql://postgres:postgres@localhost:5442/postgres?sslmode=disable";
const checkpointer = PostgresSaver.fromConnString(DB_URI);

const builder = new StateGraph(...);
const graph = builder.compile({ checkpointer });
示例:使用 Postgres 检查点器
Setup
首次使用 Postgres 检查点器时,需要调用 checkpointer.setup()
from langchain.chat_models import init_chat_model
from langgraph.graph import StateGraph, MessagesState, START
# highlight-next-line
from langgraph.checkpoint.postgres import PostgresSaver

model = init_chat_model(model="anthropic:claude-3-5-haiku-latest")

DB_URI = "postgresql://postgres:postgres@localhost:5442/postgres?sslmode=disable"
# highlight-next-line
with PostgresSaver.from_conn_string(DB_URI) as checkpointer:
    # checkpointer.setup()

    def call_model(state: MessagesState):
        response = model.invoke(state["messages"])
        return {"messages": response}

    builder = StateGraph(MessagesState)
    builder.add_node(call_model)
    builder.add_edge(START, "call_model")

    # highlight-next-line
    graph = builder.compile(checkpointer=checkpointer)

    config = {
        "configurable": {
            # highlight-next-line
            "thread_id": "1"
        }
    }

    for chunk in graph.stream(
        {"messages": [{"role": "user", "content": "hi! I'm bob"}]},
        # highlight-next-line
        config,
        stream_mode="values"
    ):
        chunk["messages"][-1].pretty_print()

    for chunk in graph.stream(
        {"messages": [{"role": "user", "content": "what's my name?"}]},
        # highlight-next-line
        config,
        stream_mode="values"
    ):
        chunk["messages"][-1].pretty_print()
from langchain.chat_models import init_chat_model
from langgraph.graph import StateGraph, MessagesState, START
# highlight-next-line
from langgraph.checkpoint.postgres.aio import AsyncPostgresSaver

model = init_chat_model(model="anthropic:claude-3-5-haiku-latest")

DB_URI = "postgresql://postgres:postgres@localhost:5442/postgres?sslmode=disable"
# highlight-next-line
async with AsyncPostgresSaver.from_conn_string(DB_URI) as checkpointer:
    # await checkpointer.setup()

    async def call_model(state: MessagesState):
        response = await model.ainvoke(state["messages"])
        return {"messages": response}

    builder = StateGraph(MessagesState)
    builder.add_node(call_model)
    builder.add_edge(START, "call_model")

    # highlight-next-line
    graph = builder.compile(checkpointer=checkpointer)

    config = {
        "configurable": {
            # highlight-next-line
            "thread_id": "1"
        }
    }

    async for chunk in graph.astream(
        {"messages": [{"role": "user", "content": "hi! I'm bob"}]},
        # highlight-next-line
        config,
        stream_mode="values"
    ):
        chunk["messages"][-1].pretty_print()

    async for chunk in graph.astream(
        {"messages": [{"role": "user", "content": "what's my name?"}]},
        # highlight-next-line
        config,
        stream_mode="values"
    ):
        chunk["messages"][-1].pretty_print()
Setup
首次使用 Postgres 检查点器时,需要调用 checkpointer.setup()
import { ChatAnthropic } from "@langchain/anthropic";
import { StateGraph, MessagesZodState, START } from "@langchain/langgraph";
import { PostgresSaver } from "@langchain/langgraph-checkpoint-postgres";

const model = new ChatAnthropic({ model: "claude-3-5-haiku-20241022" });

const DB_URI = "postgresql://postgres:postgres@localhost:5442/postgres?sslmode=disable";
const checkpointer = PostgresSaver.fromConnString(DB_URI);
// await checkpointer.setup();

const builder = new StateGraph(MessagesZodState)
  .addNode("call_model", async (state) => {
    const response = await model.invoke(state.messages);
    return { messages: [response] };
  })
  .addEdge(START, "call_model");

const graph = builder.compile({ checkpointer });

const config = {
  configurable: {
    thread_id: "1"
  }
};

for await (const chunk of await graph.stream(
  { messages: [{ role: "user", content: "hi! I'm bob" }] },
  { ...config, streamMode: "values" }
)) {
  console.log(chunk.messages.at(-1)?.content);
}

for await (const chunk of await graph.stream(
  { messages: [{ role: "user", content: "what's my name?" }] },
  { ...config, streamMode: "values" }
)) {
  console.log(chunk.messages.at(-1)?.content);
}
示例:使用 MongoDB 检查点器
设置
要使用 MongoDB 检查点器,你需要一个 MongoDB 集群。如果还没有,请按照此指南创建集群。
from langchain.chat_models import init_chat_model
from langgraph.graph import StateGraph, MessagesState, START
# highlight-next-line
from langgraph.checkpoint.mongodb import MongoDBSaver

model = init_chat_model(model="anthropic:claude-3-5-haiku-latest")

DB_URI = "localhost:27017"
# highlight-next-line
with MongoDBSaver.from_conn_string(DB_URI) as checkpointer:

    def call_model(state: MessagesState):
        response = model.invoke(state["messages"])
        return {"messages": response}

    builder = StateGraph(MessagesState)
    builder.add_node(call_model)
    builder.add_edge(START, "call_model")

    # highlight-next-line
    graph = builder.compile(checkpointer=checkpointer)

    config = {
        "configurable": {
            # highlight-next-line
            "thread_id": "1"
        }
    }

    for chunk in graph.stream(
        {"messages": [{"role": "user", "content": "hi! I'm bob"}]},
        # highlight-next-line
        config,
        stream_mode="values"
    ):
        chunk["messages"][-1].pretty_print()

    for chunk in graph.stream(
        {"messages": [{"role": "user", "content": "what's my name?"}]},
        # highlight-next-line
        config,
        stream_mode="values"
    ):
        chunk["messages"][-1].pretty_print()
from langchain.chat_models import init_chat_model
from langgraph.graph import StateGraph, MessagesState, START
# highlight-next-line
from langgraph.checkpoint.mongodb.aio import AsyncMongoDBSaver

model = init_chat_model(model="anthropic:claude-3-5-haiku-latest")

DB_URI = "localhost:27017"
# highlight-next-line
async with AsyncMongoDBSaver.from_conn_string(DB_URI) as checkpointer:

    async def call_model(state: MessagesState):
        response = await model.ainvoke(state["messages"])
        return {"messages": response}

    builder = StateGraph(MessagesState)
    builder.add_node(call_model)
    builder.add_edge(START, "call_model")

    # highlight-next-line
    graph = builder.compile(checkpointer=checkpointer)

    config = {
        "configurable": {
            # highlight-next-line
            "thread_id": "1"
        }
    }

    async for chunk in graph.astream(
        {"messages": [{"role": "user", "content": "hi! I'm bob"}]},
        # highlight-next-line
        config,
        stream_mode="values"
    ):
        chunk["messages"][-1].pretty_print()

    async for chunk in graph.astream(
        {"messages": [{"role": "user", "content": "what's my name?"}]},
        # highlight-next-line
        config,
        stream_mode="values"
    ):
        chunk["messages"][-1].pretty_print()
示例:使用 Redis 检查点器
Setup
首次使用 Redis 检查点器时,需要调用 checkpointer.setup()
from langchain.chat_models import init_chat_model
from langgraph.graph import StateGraph, MessagesState, START
# highlight-next-line
from langgraph.checkpoint.redis import RedisSaver

model = init_chat_model(model="anthropic:claude-3-5-haiku-latest")

DB_URI = "redis://localhost:6379"
# highlight-next-line
with RedisSaver.from_conn_string(DB_URI) as checkpointer:
    # checkpointer.setup()

    def call_model(state: MessagesState):
        response = model.invoke(state["messages"])
        return {"messages": response}

    builder = StateGraph(MessagesState)
    builder.add_node(call_model)
    builder.add_edge(START, "call_model")

    # highlight-next-line
    graph = builder.compile(checkpointer=checkpointer)

    config = {
        "configurable": {
            # highlight-next-line
            "thread_id": "1"
        }
    }

    for chunk in graph.stream(
        {"messages": [{"role": "user", "content": "hi! I'm bob"}]},
        # highlight-next-line
        config,
        stream_mode="values"
    ):
        chunk["messages"][-1].pretty_print()

    for chunk in graph.stream(
        {"messages": [{"role": "user", "content": "what's my name?"}]},
        # highlight-next-line
        config,
        stream_mode="values"
    ):
        chunk["messages"][-1].pretty_print()
from langchain.chat_models import init_chat_model
from langgraph.graph import StateGraph, MessagesState, START
# highlight-next-line
from langgraph.checkpoint.redis.aio import AsyncRedisSaver

model = init_chat_model(model="anthropic:claude-3-5-haiku-latest")

DB_URI = "redis://localhost:6379"
# highlight-next-line
async with AsyncRedisSaver.from_conn_string(DB_URI) as checkpointer:
    # await checkpointer.asetup()

    async def call_model(state: MessagesState):
        response = await model.ainvoke(state["messages"])
        return {"messages": response}

    builder = StateGraph(MessagesState)
    builder.add_node(call_model)
    builder.add_edge(START, "call_model")

    # highlight-next-line
    graph = builder.compile(checkpointer=checkpointer)

    config = {
        "configurable": {
            # highlight-next-line
            "thread_id": "1"
        }
    }

    async for chunk in graph.astream(
        {"messages": [{"role": "user", "content": "hi! I'm bob"}]},
        # highlight-next-line
        config,
        stream_mode="values"
    ):
        chunk["messages"][-1].pretty_print()

    async for chunk in graph.astream(
        {"messages": [{"role": "user", "content": "what's my name?"}]},
        # highlight-next-line
        config,
        stream_mode="values"
    ):
        chunk["messages"][-1].pretty_print()
在子图中使用
如果你的图包含 子图,你只需要在编译父图时提供检查点器。LangGraph 会自动将检查点器传播到子图。
from langgraph.graph import START, StateGraph
from langgraph.checkpoint.memory import InMemorySaver
from typing import TypedDict

class State(TypedDict):
    foo: str

# 子图

def subgraph_node_1(state: State):
    return {"foo": state["foo"] + "bar"}

subgraph_builder = StateGraph(State)
subgraph_builder.add_node(subgraph_node_1)
subgraph_builder.add_edge(START, "subgraph_node_1")
# highlight-next-line
subgraph = subgraph_builder.compile()

# 父图

builder = StateGraph(State)
# highlight-next-line
builder.add_node("node_1", subgraph)
builder.add_edge(START, "node_1")

checkpointer = InMemorySaver()
# highlight-next-line
graph = builder.compile(checkpointer=checkpointer)
import { StateGraph, START, MemorySaver } from "@langchain/langgraph";
import { z } from "zod";

const State = z.object({ foo: z.string() });

const subgraphBuilder = new StateGraph(State)
  .addNode("subgraph_node_1", (state) => {
    return { foo: state.foo + "bar" };
  })
  .addEdge(START, "subgraph_node_1");
const subgraph = subgraphBuilder.compile();

const builder = new StateGraph(State)
  .addNode("node_1", subgraph)
  .addEdge(START, "node_1");

const checkpointer = new MemorySaver();
const graph = builder.compile({ checkpointer });
如果你希望子图拥有自己的记忆,可以使用适当的检查点器选项编译它。这在 多智能代理 系统中很有用,如果你希望智能代理跟踪它们的内部消息历史。
subgraph_builder = StateGraph(...)
# highlight-next-line
subgraph = subgraph_builder.compile(checkpointer=True)
const subgraphBuilder = new StateGraph(...);
// highlight-next-line
const subgraph = subgraphBuilder.compile({ checkpointer: true });
在工具中读取短期记忆
LangGraph 允许智能代理在工具内部访问其短期记忆(状态)。
from typing import Annotated
from langgraph.prebuilt import InjectedState, create_react_agent

class CustomState(AgentState):
    # highlight-next-line
    user_id: str

def get_user_info(
    # highlight-next-line
    state: Annotated[CustomState, InjectedState]
) -> str:
    """Look up user info."""
    # highlight-next-line
    user_id = state["user_id"]
    return "User is John Smith" if user_id == "user_123" else "Unknown user"

agent = create_react_agent(
    model="anthropic:claude-3-7-sonnet-latest",
    tools=[get_user_info],
    # highlight-next-line
    state_schema=CustomState,
)

agent.invoke({
    "messages": "look up user information",
    # highlight-next-line
    "user_id": "user_123"
})
import { tool } from "@langchain/core/tools";
import { z } from "zod";
import {
  MessagesZodState,
  LangGraphRunnableConfig,
} from "@langchain/langgraph";
import { createReactAgent } from "@langchain/langgraph/prebuilt";

const CustomState = z.object({
  messages: MessagesZodState.shape.messages,
  userId: z.string(),
});

const getUserInfo = tool(
  async (_, config: LangGraphRunnableConfig) => {
    const userId = config.configurable?.userId;
    return userId === "user_123" ? "User is John Smith" : "Unknown user";
  },
  {
    name: "get_user_info",
    description: "Look up user info.",
    schema: z.object({}),
  }
);

const agent = createReactAgent({
  llm: model,
  tools: [getUserInfo],
  stateSchema: CustomState,
});

await agent.invoke({
  messages: [{ role: "user", content: "look up user information" }],
  userId: "user_123",
});
有关更多信息,请参阅 上下文 指南。
从工具写入短期记忆
要在执行期间修改智能代理的短期记忆(状态),你可以直接从工具返回状态更新。这对于持久化中间结果或使信息可供后续工具或提示词访问非常有用。
from typing import Annotated
from langchain_core.tools import InjectedToolCallId
from langchain_core.runnables import RunnableConfig
from langchain_core.messages import ToolMessage
from langgraph.prebuilt import InjectedState, create_react_agent
from langgraph.prebuilt.chat_agent_executor import AgentState
from langgraph.types import Command

class CustomState(AgentState):
    # highlight-next-line
    user_name: str

def update_user_info(
    tool_call_id: Annotated[str, InjectedToolCallId],
    config: RunnableConfig
) -> Command:
    """Look up and update user info."""
    user_id = config["configurable"].get("user_id")
    name = "John Smith" if user_id == "user_123" else "Unknown user"
    # highlight-next-line
    return Command(update={
        # highlight-next-line
        "user_name": name,
        # 更新消息历史
        "messages": [
            ToolMessage(
                "Successfully looked up user information",
                tool_call_id=tool_call_id
            )
        ]
    })

def greet(
    # highlight-next-line
    state: Annotated[CustomState, InjectedState]
) -> str:
    """Use this to greet the user once you found their info."""
    user_name = state["user_name"]
    return f"Hello {user_name}!"

agent = create_react_agent(
    model="anthropic:claude-3-7-sonnet-latest",
    tools=[update_user_info, greet],
    # highlight-next-line
    state_schema=CustomState
)

agent.invoke(
    {"messages": [{"role": "user", "content": "greet the user"}]},
    # highlight-next-line
    config={"configurable": {"user_id": "user_123"}}
)
import { tool } from "@langchain/core/tools";
import { z } from "zod";
import {
  MessagesZodState,
  LangGraphRunnableConfig,
  Command,
} from "@langchain/langgraph";
import { createReactAgent } from "@langchain/langgraph/prebuilt";

const CustomState = z.object({
  messages: MessagesZodState.shape.messages,
  userName: z.string().optional(),
});

const updateUserInfo = tool(
  async (_, config: LangGraphRunnableConfig) => {
    const userId = config.configurable?.userId;
    const name = userId === "user_123" ? "John Smith" : "Unknown user";
    return new Command({
      update: {
        userName: name,
        // 更新消息历史
        messages: [
          {
            role: "tool",
            content: "Successfully looked up user information",
            tool_call_id: config.toolCall?.id,
          },
        ],
      },
    });
  },
  {
    name: "update_user_info",
    description: "Look up and update user info.",
    schema: z.object({}),
  }
);

const greet = tool(
  async (_, config: LangGraphRunnableConfig) => {
    const userName = config.configurable?.userName;
    return `Hello ${userName}!`;
  },
  {
    name: "greet",
    description: "Use this to greet the user once you found their info.",
    schema: z.object({}),
  }
);

const agent = createReactAgent({
  llm: model,
  tools: [updateUserInfo, greet],
  stateSchema: CustomState,
});

await agent.invoke(
  { messages: [{ role: "user", content: "greet the user" }] },
  { configurable: { userId: "user_123" } }
);
添加长期记忆
使用长期记忆来存储跨对话的用户特定或应用特定数据。
# highlight-next-line
from langgraph.store.memory import InMemoryStore
from langgraph.graph import StateGraph

# highlight-next-line
store = InMemoryStore()

builder = StateGraph(...)
# highlight-next-line
graph = builder.compile(store=store)
import { InMemoryStore, StateGraph } from "@langchain/langgraph";

const store = new InMemoryStore();

const builder = new StateGraph(...);
const graph = builder.compile({ store });
在生产环境中使用
在生产环境中,使用数据库支持的存储:
from langgraph.store.postgres import PostgresStore

DB_URI = "postgresql://postgres:postgres@localhost:5442/postgres?sslmode=disable"
# highlight-next-line
with PostgresStore.from_conn_string(DB_URI) as store:
    builder = StateGraph(...)
    # highlight-next-line
    graph = builder.compile(store=store)
import { PostgresStore } from "@langchain/langgraph-checkpoint-postgres";

const DB_URI = "postgresql://postgres:postgres@localhost:5442/postgres?sslmode=disable";
const store = PostgresStore.fromConnString(DB_URI);

const builder = new StateGraph(...);
const graph = builder.compile({ store });
在工具中读取长期记忆
from langchain_core.runnables import RunnableConfig
from langgraph.config import get_store
from langgraph.prebuilt import create_react_agent
from langgraph.store.memory import InMemoryStore

# highlight-next-line
store = InMemoryStore() # (1)!

# highlight-next-line
store.put(  # (2)!
    ("users",),  # (3)!
    "user_123",  # (4)!
    {
        "name": "John Smith",
        "language": "English",
    } # (5)!
)

def get_user_info(config: RunnableConfig) -> str:
    """Look up user info."""
    # 与提供给 `create_react_agent` 的相同
    # highlight-next-line
    store = get_store() # (6)!
    user_id = config["configurable"].get("user_id")
    # highlight-next-line
    user_info = store.get(("users",), user_id) # (7)!
    return str(user_info.value) if user_info else "Unknown user"

agent = create_react_agent(
    model="anthropic:claude-3-7-sonnet-latest",
    tools=[get_user_info],
    # highlight-next-line
    store=store # (8)!
)

# 运行智能代理
agent.invoke(
    {"messages": [{"role": "user", "content": "look up user information"}]},
    # highlight-next-line
    config={"configurable": {"user_id": "user_123"}}
)
InMemoryStore是一个在内存中存储数据的存储。在生产环境中,你通常会使用数据库或其他持久化存储。请查看 存储文档 了解更多选项。如果你使用 LangGraph Platform 部署,平台将为你提供生产就绪的存储。- 在此示例中,我们使用
put方法向存储写入一些示例数据。请参阅 @[BaseStore.put] API 参考了解更多详情。 - 第一个参数是命名空间。用于将相关数据分组在一起。在本例中,我们使用
users命名空间来分组用户数据。 - 命名空间内的键。此示例使用用户 ID 作为键。
- 我们要为给定用户存储的数据。
get_store函数用于访问存储。你可以从代码的任何位置调用它,包括工具和提示词。此函数返回创建智能代理时传递的存储。get方法用于从存储检索数据。第一个参数是命名空间,第二个参数是键。这将返回一个StoreValue对象,其中包含值和关于值的元数据。store被传递给智能代理。这使智能代理能够在运行工具时访问存储。你也可以使用get_store函数从代码的任何位置访问存储。
import { tool } from "@langchain/core/tools";
import { z } from "zod";
import { LangGraphRunnableConfig, InMemoryStore } from "@langchain/langgraph";
import { createReactAgent } from "@langchain/langgraph/prebuilt";

const store = new InMemoryStore(); // (1)!

await store.put(
  // (2)!
  ["users"], // (3)!
  "user_123", // (4)!
  {
    name: "John Smith",
    language: "English",
  } // (5)!
);

const getUserInfo = tool(
  async (_, config: LangGraphRunnableConfig) => {
    /**Look up user info.*/
    // 与提供给 `createReactAgent` 的相同
    const store = config.store; // (6)!
    const userId = config.configurable?.userId;
    const userInfo = await store?.get(["users"], userId); // (7)!
    return userInfo?.value ? JSON.stringify(userInfo.value) : "Unknown user";
  },
  {
    name: "get_user_info",
    description: "Look up user info.",
    schema: z.object({}),
  }
);

const agent = createReactAgent({
  llm: model,
  tools: [getUserInfo],
  store, // (8)!
});

// 运行智能代理
await agent.invoke(
  { messages: [{ role: "user", content: "look up user information" }] },
  { configurable: { userId: "user_123" } }
);
InMemoryStore是一个在内存中存储数据的存储。在生产环境中,你通常会使用数据库或其他持久化存储。请查看 存储文档 了解更多选项。如果你使用 LangGraph Platform 部署,平台将为你提供生产就绪的存储。- 在此示例中,我们使用
put方法向存储写入一些示例数据。请参阅 @[BaseStore.put] API 参考了解更多详情。 - 第一个参数是命名空间。用于将相关数据分组在一起。在本例中,我们使用
users命名空间来分组用户数据。 - 命名空间内的键。此示例使用用户 ID 作为键。
- 我们要为给定用户存储的数据。
- 存储可从传递给工具的 config 对象访问。你可以从代码的任何位置调用它,包括工具和提示词。此函数返回创建智能代理时传递的存储。
get方法用于从存储检索数据。第一个参数是命名空间,第二个参数是键。这将返回一个StoreValue对象,其中包含值和关于值的元数据。store被传递给智能代理。这使智能代理能够在运行工具时访问存储。你也可以使用 config 中的 store 从代码的任何位置访问它。
从工具写入长期记忆
from typing_extensions import TypedDict

from langgraph.config import get_store
from langchain_core.runnables import RunnableConfig
from langgraph.prebuilt import create_react_agent
from langgraph.store.memory import InMemoryStore

store = InMemoryStore() # (1)!

class UserInfo(TypedDict): # (2)!
    name: str

def save_user_info(user_info: UserInfo, config: RunnableConfig) -> str: # (3)!
    """Save user info."""
    # 与提供给 `create_react_agent` 的相同
    # highlight-next-line
    store = get_store() # (4)!
    user_id = config["configurable"].get("user_id")
    # highlight-next-line
    store.put(("users",), user_id, user_info) # (5)!
    return "Successfully saved user info."

agent = create_react_agent(
    model="anthropic:claude-3-7-sonnet-latest",
    tools=[save_user_info],
    # highlight-next-line
    store=store
)

# 运行智能代理
agent.invoke(
    {"messages": [{"role": "user", "content": "My name is John Smith"}]},
    # highlight-next-line
    config={"configurable": {"user_id": "user_123"}} # (6)!
)

# 你可以直接访问存储来获取值
store.get(("users",), "user_123").value
InMemoryStore是一个在内存中存储数据的存储。在生产环境中,你通常会使用数据库或其他持久化存储。请查看 存储文档 了解更多选项。如果你使用 LangGraph Platform 部署,平台将为你提供生产就绪的存储。UserInfo类是一个定义用户信息结构的TypedDict。LLM 将使用它根据模式格式化响应。save_user_info函数是一个允许智能代理更新用户信息的工具。这对于用户想要更新其个人资料信息的聊天应用可能很有用。get_store函数用于访问存储。你可以从代码的任何位置调用它,包括工具和提示词。此函数返回创建智能代理时传递的存储。put方法用于在存储中存储数据。第一个参数是命名空间,第二个参数是键。这将在存储中存储用户信息。user_id在 config 中传递。用于标识正在更新信息的用户。
import { tool } from "@langchain/core/tools";
import { z } from "zod";
import { LangGraphRunnableConfig, InMemoryStore } from "@langchain/langgraph";
import { createReactAgent } from "@langchain/langgraph/prebuilt";

const store = new InMemoryStore(); // (1)!

const UserInfo = z.object({
  // (2)!
  name: z.string(),
});

const saveUserInfo = tool(
  async (
    userInfo: z.infer<typeof UserInfo>,
    config: LangGraphRunnableConfig
  ) => {
    // (3)!
    /**Save user info.*/
    // 与提供给 `createReactAgent` 的相同
    const store = config.store; // (4)!
    const userId = config.configurable?.userId;
    await store?.put(["users"], userId, userInfo); // (5)!
    return "Successfully saved user info.";
  },
  {
    name: "save_user_info",
    description: "Save user info.",
    schema: UserInfo,
  }
);

const agent = createReactAgent({
  llm: model,
  tools: [saveUserInfo],
  store,
});

// 运行智能代理
await agent.invoke(
  { messages: [{ role: "user", content: "My name is John Smith" }] },
  { configurable: { userId: "user_123" } } // (6)!
);

// 你可以直接访问存储来获取值
const result = await store.get(["users"], "user_123");
console.log(result?.value);
InMemoryStore是一个在内存中存储数据的存储。在生产环境中,你通常会使用数据库或其他持久化存储。请查看 存储文档 了解更多选项。如果你使用 LangGraph Platform 部署,平台将为你提供生产就绪的存储。UserInfo模式定义了用户信息的结构。LLM 将使用它根据模式格式化响应。saveUserInfo函数是一个允许智能代理更新用户信息的工具。这对于用户想要更新其个人资料信息的聊天应用可能很有用。- 存储可从传递给工具的 config 对象访问。你可以从代码的任何位置调用它,包括工具和提示词。此函数返回创建智能代理时传递的存储。
put方法用于在存储中存储数据。第一个参数是命名空间,第二个参数是键。这将在存储中存储用户信息。userId在 config 中传递。用于标识正在更新信息的用户。
使用语义搜索
在图的记忆存储中启用语义搜索,让图智能代理能够通过语义相似性搜索存储中的项目。
from langchain.embeddings import init_embeddings
from langgraph.store.memory import InMemoryStore

# 创建启用语义搜索的存储
embeddings = init_embeddings("openai:text-embedding-3-small")
store = InMemoryStore(
    index={
        "embed": embeddings,
        "dims": 1536,
    }
)

store.put(("user_123", "memories"), "1", {"text": "I love pizza"})
store.put(("user_123", "memories"), "2", {"text": "I am a plumber"})

items = store.search(
    ("user_123", "memories"), query="I'm hungry", limit=1
)
import { OpenAIEmbeddings } from "@langchain/openai";
import { InMemoryStore } from "@langchain/langgraph";

// 创建启用语义搜索的存储
const embeddings = new OpenAIEmbeddings({ model: "text-embedding-3-small" });
const store = new InMemoryStore({
  index: {
    embeddings,
    dims: 1536,
  },
});

await store.put(["user_123", "memories"], "1", { text: "I love pizza" });
await store.put(["user_123", "memories"], "2", { text: "I am a plumber" });

const items = await store.search(["user_123", "memories"], {
  query: "I'm hungry",
  limit: 1,
});
有关如何在 LangGraph 记忆存储中使用语义搜索的更多信息,请参阅 此指南。
管理短期记忆
启用 短期记忆 后,长对话可能会超出 LLM 的上下文窗口。常见解决方案包括:
- 裁剪消息:删除最早或最新的 N 条消息(在调用 LLM 之前)
- 删除消息:从 LangGraph 状态永久删除
- 摘要消息:摘要历史中较早的消息并用摘要替换它们
- 管理检查点:存储和检索消息历史
- 自定义策略(例如,消息过滤等)
这允许智能代理跟踪对话,同时不超出 LLM 的上下文窗口。
裁剪消息
大多数 LLM 都有最大支持的上下文窗口(以 token 计)。决定何时截断消息的一种方法是计算消息历史中的 token 数量,并在接近限制时截断。如果你使用 LangChain,可以使用 trim messages 实用程序并指定要从列表中保留的 token 数量,以及用于处理边界的 strategy(例如,保留最后 maxTokens)。
要在智能代理中裁剪消息历史,使用 @[pre_model_hook][create_react_agent] 配合 trim_messages 函数:
# highlight-next-line
from langchain_core.messages.utils import (
    # highlight-next-line
    trim_messages,
    # highlight-next-line
    count_tokens_approximately
# highlight-next-line
)
from langgraph.prebuilt import create_react_agent

# 此函数将在每次调用 LLM 的节点之前调用
def pre_model_hook(state):
    trimmed_messages = trim_messages(
        state["messages"],
        strategy="last",
        token_counter=count_tokens_approximately,
        max_tokens=384,
        start_on="human",
        end_on=("human", "tool"),
    )
    # highlight-next-line
    return {"llm_input_messages": trimmed_messages}

checkpointer = InMemorySaver()
agent = create_react_agent(
    model,
    tools,
    # highlight-next-line
    pre_model_hook=pre_model_hook,
    checkpointer=checkpointer,
)
要在智能代理中裁剪消息历史,使用 stateModifier 配合 trimMessages 函数:
import { trimMessages } from "@langchain/core/messages";
import { createReactAgent } from "@langchain/langgraph/prebuilt";

// 此函数将在每次调用 LLM 的节点之前调用
const stateModifier = async (state) => {
  return trimMessages(state.messages, {
    strategy: "last",
    maxTokens: 384,
    startOn: "human",
    endOn: ["human", "tool"],
  });
};

const checkpointer = new MemorySaver();
const agent = createReactAgent({
  llm: model,
  tools,
  stateModifier,
  checkpointer,
});
要裁剪消息历史,使用 trim_messages 函数:
# highlight-next-line
from langchain_core.messages.utils import (
    # highlight-next-line
    trim_messages,
    # highlight-next-line
    count_tokens_approximately
# highlight-next-line
)

def call_model(state: MessagesState):
    # highlight-next-line
    messages = trim_messages(
        state["messages"],
        strategy="last",
        token_counter=count_tokens_approximately,
        max_tokens=128,
        start_on="human",
        end_on=("human", "tool"),
    )
    response = model.invoke(messages)
    return {"messages": [response]}

builder = StateGraph(MessagesState)
builder.add_node(call_model)
...
要裁剪消息历史,使用 trimMessages 函数:
import { trimMessages } from "@langchain/core/messages";

const callModel = async (state: z.infer<typeof MessagesZodState>) => {
  const messages = trimMessages(state.messages, {
    strategy: "last",
    maxTokens: 128,
    startOn: "human",
    endOn: ["human", "tool"],
  });
  const response = await model.invoke(messages);
  return { messages: [response] };
};

const builder = new StateGraph(MessagesZodState)
  .addNode("call_model", callModel);
// ...
删除消息
你可以从图状态中删除消息来管理消息历史。当你想删除特定消息或清除整个消息历史时,这很有用。
要从图状态中删除消息,你可以使用 RemoveMessage。要使 RemoveMessage 工作,你需要使用带有 @[add_messages][] 归约器 的状态键,如 MessagesState。
要删除特定消息:
# highlight-next-line
from langchain_core.messages import RemoveMessage

def delete_messages(state):
    messages = state["messages"]
    if len(messages) > 2:
        # 删除最早的两条消息
        # highlight-next-line
        return {"messages": [RemoveMessage(id=m.id) for m in messages[:2]]}
要删除 所有 消息:
# highlight-next-line
from langgraph.graph.message import REMOVE_ALL_MESSAGES

def delete_messages(state):
    # highlight-next-line
    return {"messages": [RemoveMessage(id=REMOVE_ALL_MESSAGES)]}
要从图状态中删除消息,你可以使用 RemoveMessage。要使 RemoveMessage 工作,你需要使用带有 @[messagesStateReducer][] 归约器 的状态键,如 MessagesZodState。
要删除特定消息:
import { RemoveMessage } from "@langchain/core/messages";

const deleteMessages = (state) => {
  const messages = state.messages;
  if (messages.length > 2) {
    // 删除最早的两条消息
    return {
      messages: messages
        .slice(0, 2)
        .map((m) => new RemoveMessage({ id: m.id })),
    };
  }
};
Warning
删除消息时,确保 生成的消息历史是有效的。检查你使用的 LLM 提供商的限制。例如:
- 一些提供商要求消息历史以
user消息开始 - 大多数提供商要求带有工具调用的
assistant消息后面跟着相应的tool结果消息。
摘要消息
如上所示,裁剪或删除消息的问题是你可能会因为剔除消息队列而丢失信息。因此,一些应用受益于使用聊天模型摘要消息历史的更复杂方法。
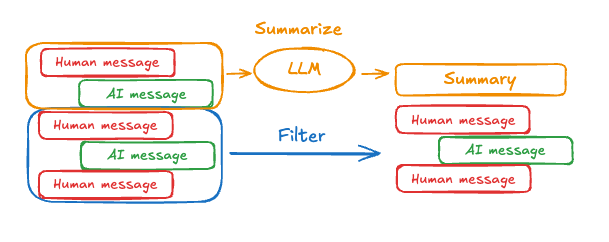
要在智能代理中摘要消息历史,使用 @[pre_model_hook][create_react_agent] 配合预构建的 SummarizationNode 抽象:
from langchain_anthropic import ChatAnthropic
from langmem.short_term import SummarizationNode, RunningSummary
from langchain_core.messages.utils import count_tokens_approximately
from langgraph.prebuilt import create_react_agent
from langgraph.prebuilt.chat_agent_executor import AgentState
from langgraph.checkpoint.memory import InMemorySaver
from typing import Any

model = ChatAnthropic(model="claude-3-7-sonnet-latest")

summarization_node = SummarizationNode( # (1)!
    token_counter=count_tokens_approximately,
    model=model,
    max_tokens=384,
    max_summary_tokens=128,
    output_messages_key="llm_input_messages",
)

class State(AgentState):
    # 注意:我们添加此键来跟踪之前的摘要信息
    # 以确保我们不会在每次 LLM 调用时都进行摘要
    # highlight-next-line
    context: dict[str, RunningSummary]  # (2)!


checkpointer = InMemorySaver() # (3)!

agent = create_react_agent(
    model=model,
    tools=tools,
    # highlight-next-line
    pre_model_hook=summarization_node, # (4)!
    # highlight-next-line
    state_schema=State, # (5)!
    checkpointer=checkpointer,
)
InMemorySaver是一个在内存中存储智能代理状态的检查点器。在生产环境中,你通常会使用数据库或其他持久化存储。请查看 检查点器文档 了解更多选项。如果你使用 LangGraph Platform 部署,平台将为你提供生产就绪的检查点器。context键被添加到智能代理的状态中。该键包含摘要节点的簿记信息。它用于跟踪最后的摘要信息,确保智能代理不会在每次 LLM 调用时都进行摘要,这可能效率低下。checkpointer被传递给智能代理。这使智能代理能够跨调用持久化其状态。pre_model_hook设置为SummarizationNode。此节点将在发送到 LLM 之前摘要消息历史。摘要节点将自动处理摘要过程并用新摘要更新智能代理的状态。如果你愿意,可以用自定义实现替换它。请参阅 @[create_react_agent][] API 参考了解更多详情。state_schema设置为State类,这是包含额外context键的自定义状态。
可以使用提示和编排逻辑来摘要消息历史。例如,在 LangGraph 中,你可以扩展 MessagesState 以包含 summary 键:
然后,你可以生成聊天历史的摘要,使用任何现有摘要作为下一个摘要的上下文。这个 summarize_conversation 节点可以在 messages 状态键中累积了一定数量的消息后调用。
def summarize_conversation(state: State):

    # 首先,我们获取任何现有的摘要
    summary = state.get("summary", "")

    # 创建我们的摘要提示
    if summary:

        # 摘要已存在
        summary_message = (
            f"This is a summary of the conversation to date: {summary}\n\n"
            "Extend the summary by taking into account the new messages above:"
        )

    else:
        summary_message = "Create a summary of the conversation above:"

    # 将提示添加到我们的历史中
    messages = state["messages"] + [HumanMessage(content=summary_message)]
    response = model.invoke(messages)

    # 删除除最近 2 条消息之外的所有消息
    delete_messages = [RemoveMessage(id=m.id) for m in state["messages"][:-2]]
    return {"summary": response.content, "messages": delete_messages}
可以使用提示和编排逻辑来摘要消息历史。例如,在 LangGraph 中,你可以扩展 MessagesZodState 以包含 summary 键:
import { MessagesZodState } from "@langchain/langgraph";
import { z } from "zod";

const State = MessagesZodState.merge(z.object({
  summary: z.string().optional(),
}));
然后,你可以生成聊天历史的摘要,使用任何现有摘要作为下一个摘要的上下文。这个 summarizeConversation 节点可以在 messages 状态键中累积了一定数量的消息后调用。
import { RemoveMessage, HumanMessage } from "@langchain/core/messages";

const summarizeConversation = async (state: z.infer<typeof State>) => {
  // 首先,我们获取任何现有的摘要
  const summary = state.summary || "";

  // 创建我们的摘要提示
  let summaryMessage: string;
  if (summary) {
    // 摘要已存在
    summaryMessage =
      `This is a summary of the conversation to date: ${summary}\n\n` +
      "Extend the summary by taking into account the new messages above:";
  } else {
    summaryMessage = "Create a summary of the conversation above:";
  }

  // 将提示添加到我们的历史中
  const messages = [
    ...state.messages,
    new HumanMessage({ content: summaryMessage })
  ];
  const response = await model.invoke(messages);

  // 删除除最近 2 条消息之外的所有消息
  const deleteMessages = state.messages
    .slice(0, -2)
    .map(m => new RemoveMessage({ id: m.id }));

  return {
    summary: response.content,
    messages: deleteMessages
  };
};
管理检查点
你可以查看和删除检查点器存储的信息。
查看线程状态(检查点)
const config = {
  configurable: {
    thread_id: "1",
    // 可选地提供特定检查点的 ID,
    // 否则显示最新的检查点
    // checkpoint_id: "1f029ca3-1f5b-6704-8004-820c16b69a5a"
  },
};
await graph.getState(config);
查看线程历史(检查点)
const config = {
  configurable: {
    thread_id: "1",
  },
};

const history = [];
for await (const state of graph.getStateHistory(config)) {
  history.push(state);
}
删除线程的所有检查点
预构建记忆工具
LangMem 是一个由 LangChain 维护的库,提供用于管理智能代理中长期记忆的工具。有关使用示例,请参阅 LangMem 文档。